
HomePage | Faq | Manual | Catalogue | Product Search | Contact Us | Find Us | Order Form | Gallery | Java | Music | Site Search | Affiliates | Site Map | Links
HomePage | Faq | Manual | Catalogue | Product Search | Contact Us | Find Us | Order Form | Gallery | Java | Music | Site Search | Affiliates | Site Map | Links
The Growth Gas Generator [GGG] is a fixed horticultural appliance for Non - Domestic use. 1.25 kW output.
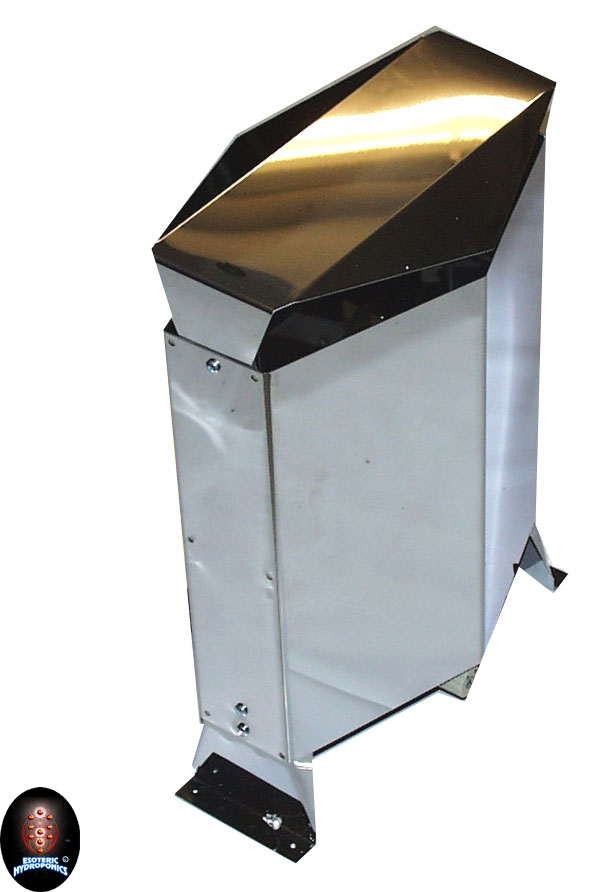
The Growth Gas Generator is a dedicated CO2 production unit, designed specifically for the small domestic greenhouse or indoor growing area. It burns readily available L.P.G (Propane Gas) to produce copious amounts of CO2 and can easily be controlled by a timer to ensure that CO2 is produced at the right time of day.
You will need to find a stable base on which to stand your Generator. It will be best located away from walkways and busy areas to ensure that it does not get knocked over. For peace of mind the generator is best screwed onto a larger metal base and holes are provided in the feet for this purpose.
Best location for gas distribution is near centre of growing area but this is not too important provided that there is plenty of air circulation by fan.
 |
WARNING! ACHTUNG! Always ensure that your growing area is adequately ventilated and that air is well circulated. |
|
||
Propane tank should be located OUTSIDE the greenhouse or growroom. If your hose is not long enough for this you can obtain a longer piece from any gas supply centre. Please ensure that you always use genuine high pressure hose like that supplied with the generator. Hose should be connected to regulator and generator. Hose clips (jubilees) must be used to ensure a gas tight fit.
Once you are completely happy with the location of your generator you can ignite the pilot. Follow the instruction manual carefully. When the pilot is alight you will be able to ignite the generator by turning on the mains.
| Size | 38cm × 23cm × 50cm high |
Weight | 4kg (9 pound) |
Electricity | 220-240 Volt AC |
|---|
| BTU/hour | KCal/hour | kW/hour | |
|---|---|---|---|
| Pilot | 800 | 200 | 0.25 |
| Maximum | 4265 | 1050 | 1.25 |
| Maximum | 0.2 pound/hour (0.1 kg/hour) propane |
|---|---|
| Pilot | 1.25 pound/hour (1.50 kg/hour) propane |
The UK "Gas Safety (Installation and Use) (Amendment) Regulations 1990" state that "ALL Gas Appliances MUST be installed by a competent gas engineer approved by the Health & Safety Executive". This applies to Propane and Natural Gas appliances. All C.O.R.G.I registered engineers are approved for this purpose and can be found in Yellow Pages under Plumbing & Heating Engineers.
All instructions and advice provided by the manufacturers regarding installation, servicing and repairs of gas appliances is therefore addressed to CORGI registered engineers as they are the only people legally able to carry out this work.
Propane. This CO2 Generator is designed to burn LPG (Propane Gas) at a pressure of 37 MB (14" WG). The pressure regulator supplied is designed to fit all Propane cylinders (orange bottles). We recommend the use of 13kg or 19kg gas cylinders or larger. We suggest that two cylinders are used and linked with an automatic changeover valve.
|
WARNING! ACHTUNG!
Your propane cylinders should be installed outside the greenhouse and growing area. |
|
||
Position the generator near the centre of the greenhouse in an area with good air circulation.
The burner in the generator is designed especially for use in greenhouses and by itself does not produce gases which are harmful to crops.
Beware of creating conditions which can cause unwanted gases to be produced. The most likely unwanted product are unbent or partly burnt gases, resulting either from a gas leak or by incomplete combustion.
DO NOT look for gas leaks with a lighted taper. Check all suspect connections with a soap solution. Watch for the bubbles. Tighten connections as necessary. Observe the Gas safety code.
This is caused by inadequate ventilation.
|
WARNING! ACHTUNG!
The generator needs a continuous supply of oxygen to ensure that all gas is completely burnt. |
|
||
Extra ventilation (minimum 24 square inches (140cm2) can be installed in such a way as to ensure that fresh air with its supply of oxygen can easily reach the burner. This is particularly important in a polythene tunnel where the generator can be several feet away from the doors where the only natural ventilation exists.
In this situation fresh air can be provided by installing a 6" (15cm) diameter plastic pipe from the outside to the base of the generator. Allow for the exhaust of burnt gas by fitting a piece of Rokolene or similar material in or above the door at the end of the tunnel house. (24 sq. in. clear area - 140 sq. cm.)
The indoor growing area should be adequately ventilated by extractor fans. Ensure that these fans are operating while generator is burning. It is also important to ensure that there is an adequate inflow of fresh air into the growing area.
Read these instructions thoroughly before operating the growth gas generator.
Ensure that adequate ventilation is provided for the generator. Inadequate ventilation will mean incomplete combustion, resulting in unburned or partially unburned gases.
xxx Unbured gases can be toxic to plants.The Generator needs a continuous supply of oxygen to ensure that all the gas is completely burned.
Electrical Connection: First you will need to connect your generator to the electric mains.
|
WARNING! ACHTUNG!
Do not plug into mains until all connections under generator are made. |
|
||
The mains lead supplied has three spade connectors. These are simply pushed onto the connections at the bottom of the generator.
Note the earth connector (yellow / green wire) this MUST be placed onto the Earth terminal which is separate from the other two and marked with the symbol @. The other two connectors are not specific and can be pushed onto either terminal. Check that all three connectors are tight.
You can now plug your generator into the mains and turn it on.
|
WARNING! ACHTUNG!
Be sure that all connections are leak proof - unburned gas can be toxic to plants. |
|
||
It is recommended that this generator be given an annual service by a competent person. Any CORGI registered engineer will be able to oblige. Should any difficulty be found lighting the generator at the beginning of a new season it may be due to a slight build up of carbon deposits around the pilot jet, Piezo igniter and thermocouple. Any such deposits should be removed very carefully.
Growing plants need a constant supply of Carbon Dioxide or CO2 to maintain growth. CO2 is present in normal unpolluted air at the rate of around 330 parts per million (ppm).
To grow plants successfully indoors or in a greenhouse, it is essential to at least provide CO2 at normal atmospheric levels. If these levels are not maintained then plant performance will be curtailed.
The Growth Gas Generator produces CO2 by burning propane gas. This is a highly efficient and cost effective source of CO2 provided that it is used correctly. Normal propane greenhouse heaters are not the most efficient way of producing CO2 as they are usually controlled by thermostats. This means that CO2 production is tied to temperature, most being produced in the dead of night when plants cannot utilise it. Growth Gas Generator is controlled by mains electricity so it can easily be switched on, by a timer, to produce CO2 in the warm bright part of the day. Growth Gas Generator is designed specifically for CO2 production and the production of heat is minimised. Growth Gas Generator is usually operative for only a few minutes every hour to maintain optimum CO2 levels.
The installation of Growth Gas Generator will have an immediate and dramatic effect on plant growth. The important thing to remember here is that you are doing more than restoring the CO2 to normal atmospheric levels. While it is a minimum requirement for good growth that CO2 should be in the range of 300 - 350 ppm. it is possible to provide it at much higher levels.
Modern research has shown that levels up to 1500 ppm. and beyond can be maintained in a greenhouse or growroom. Plants will respond amazingly well provided that they have adequate light, moisture and nutrition to enable them to take advantage of the conditions.
The serious grower who couples the simple science of hydroponics and the benefits of enhanced CO2 can achieve growth rates and yields that were only dreamt of a decade ago.
Until recently there was no simple way for the amateur grower to measure the CO2 levels in his greenhouse or growroom, it was only professionals that had the necessary equipment. Nowadays it is an easy matter with the CO2 Analysis Kit. and there is no reason for the grower to rely on guesswork any more. CO2 detection is easy with the pump action analyser syringe and analyser tubes measuring 300 to 5000 ppm. Quick measurement of CO2 in the greenhouse will tell you if your environment is optimised.
Supplied with full instructions, the kit is quick and easy to use and it will give you a reading in parts per million. The careful grower will treat CO2 as one of the most important elements in a successful growing area. It is not a difficult matter to optimise the levels and the dramatic improvement in plant performance and yields will certainly make the effort worthwhile. CO2 analysis kit can be obtained from your local supplier of Growth Technology products.
The entire greenhouse environment can be controlled by a single unit such as Shiva. These high tech controllers incorporate an infra-red carbon dioxide analyser to monitor CO2 levels and an output to switch the gas generator or CO2 regulator. These remarkable controllers will also control temperature and humidity and are the ultimate in good greenhouse management. They can be obtained through the hydroponic store where you bought your Growth Gas Generator.
You will need to find a stable base on which to stand your Generator. It will be best located away from walkways and busy areas to ensure that it does not get knocked over. For peace of mind the generator is best screwed onto a larger metal base and holes are provided in the feet for this purpose.
Best location for gas distribution is near centre of growing area but this is not too important provided that there is plenty of air circulation by fan.
Propane tank should be located OUTSIDE the greenhouse or growroom. If your hose is not long enough for this you can obtain a longer piece from any gas supply centre. Please ensure that you always use genuine high pressure hose like that supplied with the generator. Hose should be connected to regulator and generator. Hose clips (jubilees) MUST be used to ensure a gas tight fit.
Once you are completely happy with the location of your generator you can ignite the pilot. Follow the instruction manual carefully. When the pilot is alight you will be able to ignite the generator by turning on the mains. You are now ready to set your timer. Best timer for this job will be a digital one as it will allow precise time settings but you will need as many "on" and "off" settings as possible. The best digital timer we have found has 42 settings for "on" and "off" and will be available from your hydroponic retailer.
| Area | Burning Time |
|---|---|
| 5m2 | 3 minutes per half hour |
| 10m2 | 6 minutes per half hour |
| 12m2 | 7 minutes per half hour |
| 25m2 | 15 minutes per half hour |
You can use this table as a basis for your timer setting. It is recommended that you allow your generator to settle in for a couple of days after setting timer, and then take CO2 readings using a CO2 Analysis Kit. Take the readings in the middle of the growing period and then make the necessary adjustments, increasing the burning time by a couple of minutes for instance. Wait 24 hours and take a new reading. You will soon find the level that suits your situation.

HomePage | Faq | Manual | Catalogue | Product Search | Contact Us | Find Us | Order Form | Gallery | Java | Music | Site Search | Affiliates | Site Map | Links
| Bringing Nature And Technology Together: Esoteric Hydroponics 8 Martyr Road Guildford Surrey England UK GU1 4LF |
UK Telephone: 01483 596484 International Telephone: +44 1483 596484 UK Mobile: 07511 933888 Internatonal Mobile: +44 7511 933888 UK Fax: 01483 596490 International Fax: +44 1483 596490 Web: http://www.blunt.co.uk/ EMail: webmaster@blunt.co.uk |